Leaf printing
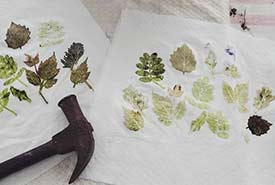
Leaf printing. (Photo by Sage Yathon)
Photos and instructions by Sage Yathon
Disclaimer: Only gather plants from your yard and don’t pick ones that you are not familiar with. Be aware of plants that could pose a health hazard, such as poison ivy or giant hogweed.
What you will need
- 100% cotton fabric
- white vinegar
- leaves and/or flowers
- a hammer
- a wooden cutting board or hard surface
- an iron
Preparing your fabric
Similar to preparing fabric for dyeing, your fabric will need to be prepared for printing. For this example, 100% cotton fabric was used. It was prepared using the vinegar mordant method, and the prints have lasted really well, even after being washed and dried. See this page for instructions with each mordant method.
Creating a print
Flowers and leaf on a layer of fabric. (Photo by Sage Yathon)
After preparing your fabric using the mordant method, gather some leaves and flowers. Look for thin leaves and flat flowers, as these will leave the clearest print. Enjoy the gathering process, be gentle with the plants and only take what you need.
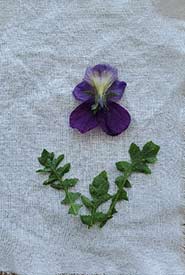
Lay down your first layer of fabric on the cutting board. Lay down an arrangement of leaves of flowers in any design you like on top of the fabric.
After hammering the flower and plant on the fabric. (Photo by Sage Yathon)
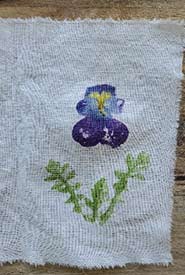
Lay down a second layer of fabric gently overtop. Holding the fabric down with one hand, gently hammer around the edges of each leaf or flower. Continue hammering until you see the entire leaf or flower showing through. Once you can see the entire print showing through, gently separate the two layers of fabric. Hang both pieces of fabric to dry. Don’t remove any bits of the leaf or flower that are stuck on the fabric, as they will peel off later once it has dried. The next day, you can peel or scratch off any leftover leaf bits or petals. To set your print, use an iron on cotton setting and press out your fabric. You may lay a cloth on top first to protect the print.
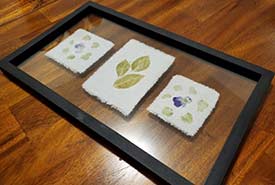
Framed prints. (Photo by Sage Yathon)
Display your print by simply by hanging it somewhere or putting it in a picture frame!